Jerusalem Artichoke Veloute – Topinambour


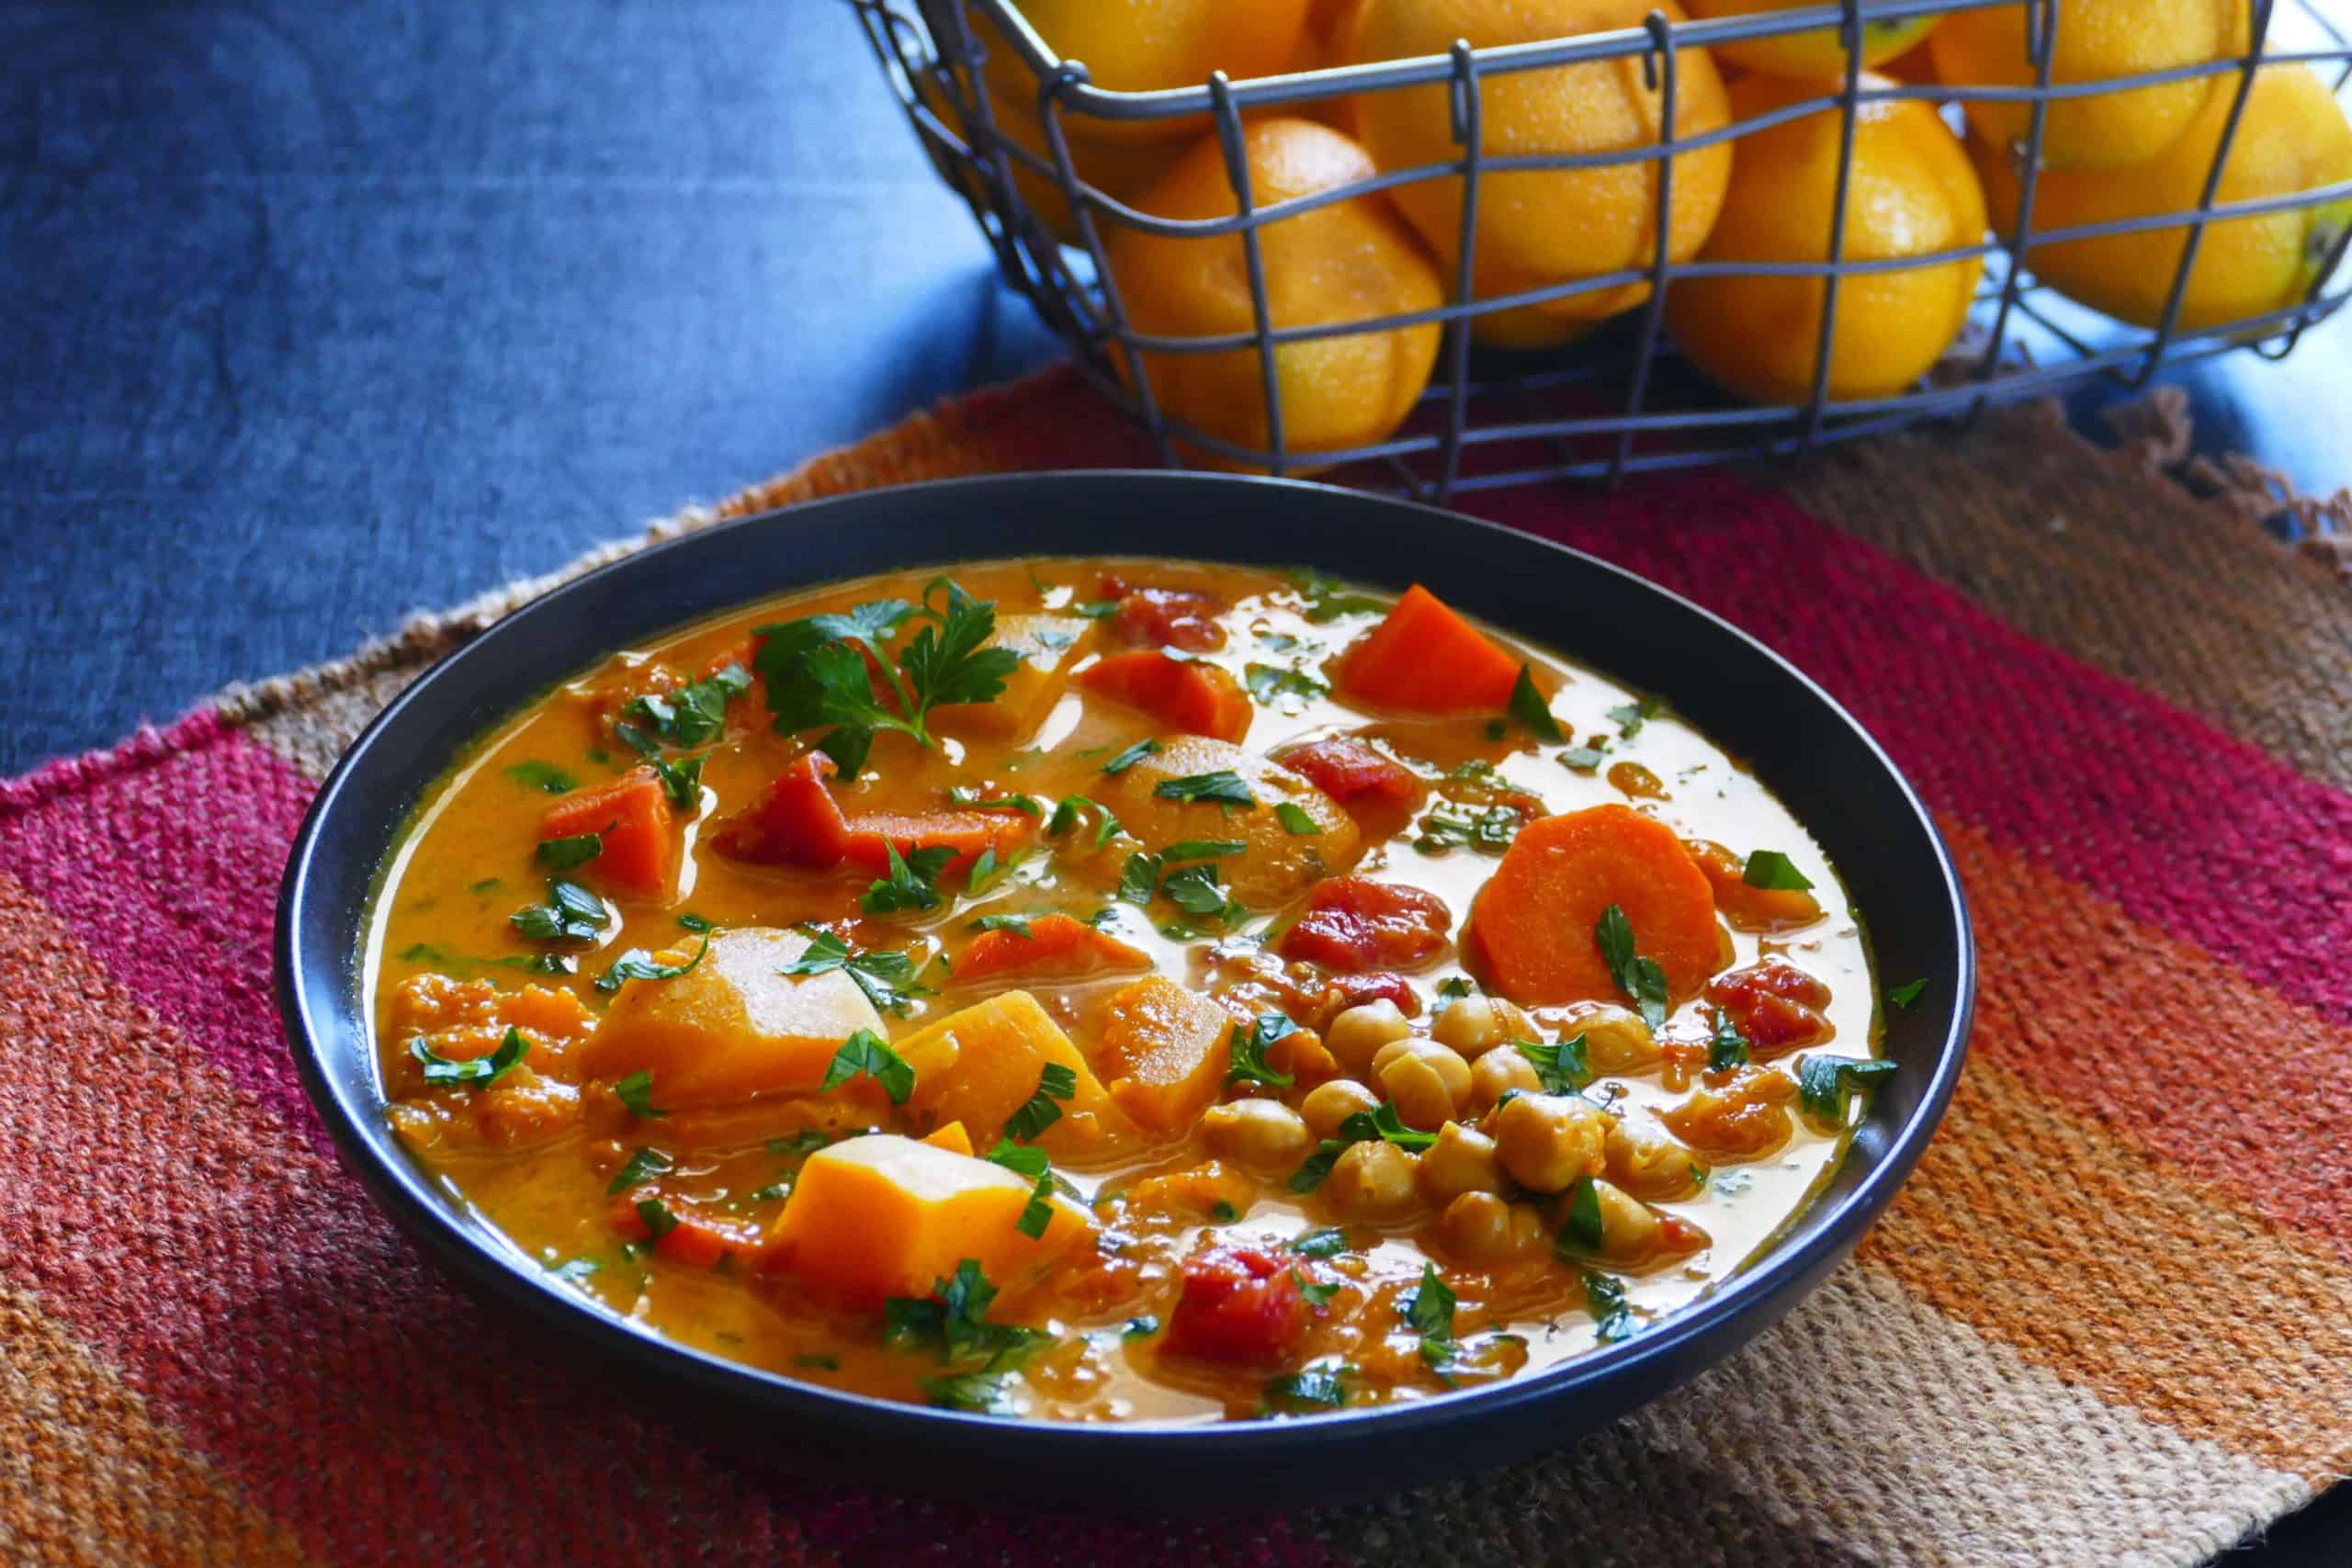
This is “my recipe”; there is no onion, parsley, pancetta, or truffle… which can all be added for a variation on the base recipe, but I still prefer the basic Velouté de Topinambour, where the taste of the Jerusalem Artichokes is well blended with the Hazelnuts and Walnut oil. A Classic at the Dehon’s family dinner.


Ingredients :

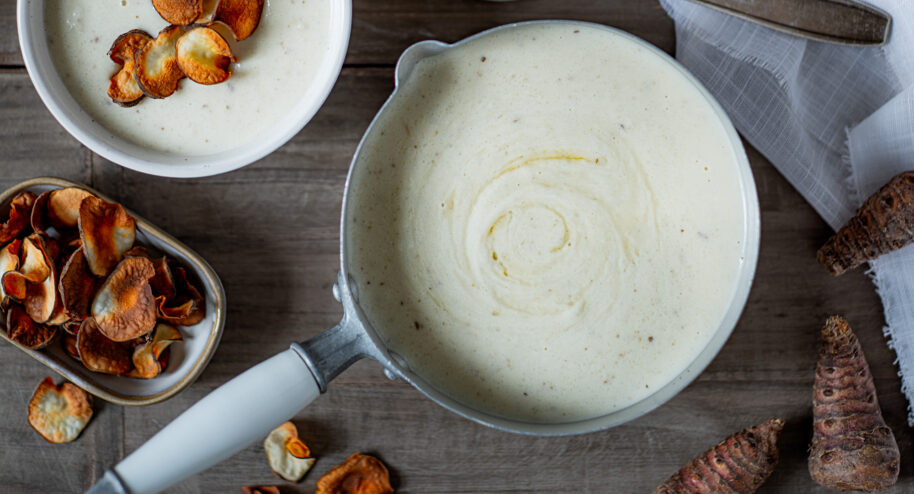
  • 500g of Jerusalem Artichokes
  • 50g of Hazelnuts
  • 1 Tablespoon of Walnut oil.
  • 20-25g of Butter
  • Salt and White Pepper
  • 1 chicken stock cube
  • 500ml of water
  • 100ml of single cream

How to Make :

  • Clean and peel the Jerusalem Artichokes (drop them in cold water so that they do not oxidise)
  • Chop the Jerusalem Artichokes into slices of about 5mm or half a cm thickness
  • Put the Jerusalem Artichokes, the Hazelnuts, the Salt, the Pepper, the Walnut oil, and the Butter in the Thermomix on “Browning” Gentle for 10 minutes.
  • Add the 500ml of water and bring to a boil. I use the Manual mode of the Thermomix for 10 minutes at 105 degrees, speed 2.
  • By now, everything is cooked, and we simply want to make a nice texture.
  • First blend for 1 minute on speed 8.
  • Add the cream and blend again for 30 seconds on speed 8.
  • Adjust Salt and Pepper as you see fit. I like it when you can taste the White Pepper.


  • If you are making it without the Thermomix, simply fry in a saucepan for 10 minutes, making sure nothing is burning at the bottom, then add the water and cook for a further 10 minutes, then blend, then blend again with the cream.
  • Serve warm.

A bit of history about the topinambour :

In France, the topinambour is deeply intertwined with the collective memory of the German Occupation (1940–1944).

While they were once a delicacy in the 17th-century French royal courts, their reputation was forever changed by the hardships of World War II.

Why they became a “War Food”

  • The Potato Shortage: During the Occupation, the German army commandeered most of France’s potato crops to feed its troops. Potatoes were also used to produce fuel (alcohol) for the German war effort.

  • The Unregulated Alternative: Unlike potatoes, topinambours were largely ignored by the occupying forces, considered “fodder” for livestock. Because they weren’t strictly rationed or seized, they became a vital survival food for the French population.

  • Roadside Growth: You are correct about their location. Because the plant is incredibly hardy and invasive, it frequently escaped gardens and grew wild along roadsides, ditches, and railway tracks. For many starving families, foraging these “wild” tubers was one of the few ways to supplement meagre rations.

The “Forgotten” Vegetable

For decades after the war, topinambours (along with rutabagas) were known in France as légumes oubliés (forgotten vegetables).

“For the generation that lived through the war, the taste of topinambour wasn’t a culinary choice—it was the taste of hunger, occupation, and digestive distress (due to the high inulin content and the lack of other foods to balance it).”

Many survivors refused to ever eat them again once the war ended, and they virtually disappeared from French markets for nearly 50 years.


The Modern Renaissance

Today, the topinambour has made a massive comeback in French “bistronomy.” Modern chefs have reclaimed it for its unique, nutty flavour, often serving it as a velvety velouté or roasting it with thyme. It’s no longer seen as a sign of poverty, but as a gourmet winter root.

Posted in Cooking, Home Life | Leave a comment

I made a “Real” App…fully deployed


I’ve tried a few…. Notion, Todoist, Things, plain text files, sticky notes, Google Sheets, Excel spreadsheets. And every time I end up back at the same place: either the app is too complex, and I spend more time organising my tasks than actually doing them, or it’s too bare-bones, and I have to work around it.

So I built OliTick. Not because the world needed another bloated to-do app, which is more of a project management tool than the true “List of things to do that clutter your brain”.

This is the Todo List app. “I” use.

The premise is simple: a clean, focused interface that gets out of your way. No deadline dates, no nested projects, no Gantt charts, no premium tiers hiding basic features. Just your tasks, clearly laid out, ready to be ticked off.

I spent a lot of time on how it looks and feels. I wanted it to be the kind of app where opening it actually makes you feel like you’ve got things under control — not one that quietly stresses you out. Generous whitespace, deliberate typography, nothing that distracts from the task at hand, but still with features that are helpful.

The bits I’m most pleased with

There are a couple of features that I’m particularly happy with:

AI Smart Labels: Type in a task, and OliTick will suggest the right label automatically. It sounds small, but in practice, it means your list stays organised without you having to think about it. The categorisation just happens, quietly, in the background. (It is also voice-enabled)

AI Insight: Ask the AI coach to review your current selection of tasks, and it will review, prioritise and provide you with a suggested attack plan to help you get through your list. You can review and use it or simply ignore it; it is all down to you to decide.

It’s in beta — and I want your feedback

OliTick is in beta right now, which means it’s real and usable, but I’m still actively building on it. If you give it a try and something feels off — or you have an idea you’d love to see — I genuinely want to hear from you. There’s a contact page on the site, and I actually read those messages.

It’s free to use for the basic Todo list, no card required. If you want to use the AI and advanced features like import and export of tasks, you will need a Pro account which is priced purely to help me cover the internet hosting costs.

Give it a go and let me know what you think.

OliTick — simple but effective task management
Now in beta. Free to use, no sign-up friction.Try it at olitick.com →
Posted in Coding, Home Life | Leave a comment

Cake Temperature

It started with a savoury cake. I was making an olive-and-pancetta cake — that French-style salé cake I have been making for years — and I found myself wondering: how do I actually know when it’s done? A skewer comes out clean long before the inside has fully set, and the colour of the crust isn’t always a reliable guide when there’s no sugar to caramelise.

The answer is a probe thermometer. And once I started thinking about internal temperatures for savoury cakes, I realised I’d never applied the same logic to sweet cakes either. So here’s a guide to both.

Savoury Cakes (e.g. olive & pancetta) Target internal temperature: 88°C – 92°C

Savoury cakes behave differently from sweet ones because their structure is built on eggs and cheese rather than sugar and fat. The egg proteins need to fully set, which means you don’t want to go below around 85°C at the centre — that’s your food safety floor. But push much above 92°C, and you’ll end up with a dry, rubbery crumb, and cured meats like pancetta will toughen noticeably.

One more tip: let your savoury cake rest after baking. It firms up beautifully as it cools and is almost always better eaten warm rather than piping hot straight from the oven.


Sweet Cakes

Different batters have different sugar and fat contents, which shifts the ideal doneness temperature more than you might expect:

Cake Type Target Internal Temp Why?
Standard Sponge 98°C – 99°C Victoria sponges and birthday cakes need to reach this to ensure the structure is fully stable.
Fruit Cake 93°C – 95°C Very dense cakes with heavy fruit shouldn’t go too high — the fruit sugars can begin to toughen.
Chocolate Cake 93°C – 96°C Higher moisture and oil content mean that keeping the temperature lower prevents the cocoa from tasting bitter or dry.

Posted in Cooking, Home Life | Leave a comment

Vietnamese Spring Rolls

I remember my mum made these in my youth and can remember it was some preparation work and fiddly with the rice paper tearing, etc….

But it was always a success at the dinner table.

I have made a few of these recently for parties with friends, and they are delicious and uncommon.

The wrapping technique below in pictures makes the whole thing a lot easier for the novice.


Ingredients :

  • 3 Shrimps per Spring Roll. 18 for 6 rolls.
  • A pack of thin rice vermicelli
  • 1 large carrotpeeled and cut into thin matchsticks
  • 1 cucumbercut into matchsticks
  • optional: a large red bell peppercut into matchsticks
  • 2 to 3 mint leaves per roll
  • lettuce leaves
  • 1 to 2 large 22cm circular rice paper sheets per roll
  • warm water for rolling spring rolls

Peanut Sauce

  • a few tablespoons of creamy peanut butter
  • same quantity of cold water
  • 2 tablespoons rice vinegar
  • 2 tablespoons soy sauce
  • 2 tablespoons maple syrupcan sub with brown sugar
  • 1 teaspoon toasted sesame oil

Nước Chấm

  • a bit of warm water
  • 3 tablespoons sugar
  • 2 tablespoons fish saucecan add more to taste
  • 1/2 lime juice
  • 1 Thai chillisliced
  • a clove of garlicminced

How to Make :

  • Assemble as per the photos below.
  • I like to sprinkle a little bit of sesame seeds on top to finish it off.
  • Can be prepared well in advance.
  • Serve chilled with the sauces, and must be eaten with your fingers.
  • I would like to explore making the deep fried versions as well.


Posted in Cooking, Home Life | Leave a comment

Mother’s Day Flower

Something I am working on at the moment. It is loosely connected to a flower…


Posted in Coding, Home Life | Leave a comment

Pi Day 2026

Happy pi-day !

Posted in Home Life | Leave a comment

The Hidden Cost of Standing Still

I saw this quote today, and it immediately brought to mind the many conversations I’ve had with my kids and friends over the years and more recently, about AI. It is a sentiment I feel strongly about—and if I’m honest, it’s a concept that carries a bit of fear for me.

“Standing still is the fastest way to go backwards.”

In a world defined by exponential technological growth and constant shifts in industry, the “ground” beneath us is always moving. Whether it is the evolution of high-tech or personal growth, the pace of change is accelerating.

One could think of this in terms of relative depreciation. If you aren’t actively appreciating—learning new skills, tinkering with new tools, or evolving your mindset—you are effectively losing value against the rest of the world.

Standing still isn’t a neutral act; it is a choice to let the gap between where you are and where the world is headed widen. It is important to realise that the choice is ours and that, in my opinion, both paths are equally acceptable, even if the external pressure of the “norm” is to join the rat race.

In my career (corporate and as a founder), I have seen people move fast without any direction more than once! Those individuals (and the world in general) would have benefited from them standing still…

I often use:

“A wave is coming…you can duck it or decide to surf it…”

Whatever you do, do it with intent.

If you’re looking for me …I am out playing in the waves…

Posted in Home Life | Leave a comment

Berocca and Tonic

Berocca Energy vs. Tonic Daily Immunity

A side-by-side comparison of the key nutritional profiles for energy performance and immune support.

Nutrient / Ingredient Berocca Energy Tonic Daily Immunity
Vitamin C 500 mg 1,000 mg
Vitamin D3 50 μg (2000 IU)
Vitamin A 1,200 μg
Vitamin B-Complex (B1, B2, B3, B5) High Dose (Avg 25mg+)
Vitamin B12 10 μg 2.5 μg
Zinc 10 mg 10 mg
Selenium 100 μg
Magnesium & Calcium 100 mg each
Reishi Mushroom Extract 1,500 mg
Sweeteners Aspartame / Acesulfame K Stevia (Natural)

The Verdict

  • Choose Berocca for mental performance, metabolic energy release, and electrolyte balance (Magnesium).
  • Choose Tonic for high-strength immune resilience (D3, Selenium, Reishi) and a natural sweetener profile.
Posted in Home Life | Leave a comment

Brioche Burger Buns


A new 2026 recipe to try for burger buns….

hummm… i tried this during the weekend and it was not a success ! I used a plain flour and maybe the yeast was not good anymore, it did not rise after hours of waiting.

The result was average

I think there was way too much butter. I might research a bit more the standard recipes for brioche and compare.


Ingredients :

  • 40g Milk (room temperature)
  • 200g eggs (4 eggs approximately)
  • 60g sugar
  • 8g Salt
  • 7g Dry Yeast
  • 500g flour
  • 250g butter
  • (Optional : 1 egg and sesames seeds for top of buns)

How to Make :

  • With Thermomix, put Milk, egg, salt, sugar, and yeast at 37 degrees Celsius and mix on speed 2 for 4 minutes.
  • Add Flour and mix on dough mode for 3 minutes.
  • Wait 5 minutes
  • Add butter in small cubes and mix on dough mode for 3 minutes.
  • Let it rest until it doubles in size.
  • Pre-heat the oven to 180 °C fan-assisted.
  • Make 80-100g dough balls. (Make sure you tuck them in)
  • Paint an egg on top of the balls and sprinkle with sesame seeds. (unless you are allergic like Jules)
  • Let it rest again until a good rise is achieved. (In a warm place on a wood plank or something not cold. – not on marble countertop)
  • Place on a silicone cooking sheet in a preheated oven at 180 °C, fan-assisted.
  • Take out and let cool on wire-rack.


Posted in Cooking | Leave a comment

Happy Valentine’s Day

Posted in Home Life | Leave a comment

Tarte au Citron de Fred et Luna

Another recipe from friends visiting us in London. This time, I tried the Thermomix function that lets me create the full recipe on the Cookidoo platform, so anyone with a Thermomix can now make this recipe.

The shortcrust pastry is upgraded with some ground almonds, which make it velvety.

Go here to start cooking!


Posted in Cooking, Home Life | Leave a comment

Almond Milk


Ingredients :

  • 300g raw almonds. I use the Californians from Costco(Kirkland). Recipes vary from 150g to 400g. I find that 300g of Raw, dry almonds is the sweet spot for me, with a nice consistency and true almond flavour.
  • A few pinches of Salt
  • Water (for the soak and for the milk itself)
  • A Nut Milk bag or mouseline bag

How to Make :

  • Soak the Almonds overnight with a pinch of Salt and Water (24h is the sweet spot)
  • Rinse the Almonds under clear cold water
  • Blend for 60 seconds on full speed in the Vitamix with a dollop of Honey and a pinch of Salt and about 1L or 1.2L of water.
  • Pour into the Nut Milk Bag over a large bowl and squeeze hard until all the milk is out.
  • Store in an airtight container in the fridge.
  • This will keep for a few days, but not much more.

The powder of the almonds can be discarded or used for other purpose such as Almond flour. I have tried to make some Almond flour but it is not my thing…


Posted in Cooking | Leave a comment

Foie Gras 2025 Version


This is actually a lot easier if you can source the raw ingredient from a quality source.

In particular, if you can buy a fresh de-nerved foie and have a temperature probe.


Ingredients :

  • 1 Foie Gras (de-nerved)
  • 2 Teaspoons of Salt
  • 1/2 tsp of Madagascar Pepper
  • 1/2 tsp of White Pepper
  • 2 tbsp of Armagnac
  • 1 Terrine for the cooking

How to Make :

  • Assuming you have a de-nerved Foie Gras (fresh, uncooked, but the veins have been removed already). Check my 2012 recipe if required. You can do this yourself.
  • Sprinkle the Salt and Pepper on all sides of the foie
  • Pour the Armagnac
  • Put the foie in the terrine and push well so there are no air spaces
  • Cook in the oven at 120 degrees. I use the top and bottom modes to keep it gentle. (Use a bain-marie if your oven is not very precise and you are worried that it would overcook)
  • Use a temperature probe to check the inside temperature of the foie.
  • Cook until the centre of the foie reaches 48 degrees Celsius.
  • Cool down with a weight on the top of the foie to ensure it fills the terrine properly.
  • Put into the fridge for a few hours to firm up.

When serving to eat, take the foie gras out of the fridge 30 minutes beforehand so it can be sliced more easily.

Serve with bread and a sweet wine like a Montbazillac or a Sauterne.

Posted in Cooking, Home Life | Leave a comment

Plum and Frangipane Tart


Ingredients :

  • 8 Plums or a bit more – cut into 1/8th
  • 125g of Butter (or a bit more up to 150g for richer)
  • 250g of plain flour
  • 1 egg yolk
  • 50g of water

Frangipane :

  • 100g butter
  • 125g caster sugar
  • 175g ground almonds
  • 50g of plain flour
  • 2 eggs beaten


How to Make :

  • Make the shortcrust pastry first so it can rest in the fridge for a little while.
  • Mix the flour, butter, egg yolk, and a small amount of water to make a dough.
  • With Thermomix – 20 seconds on speed 4.
  • Wrap in some clingfilm and put into the fridge until you are done with the rest of the preparation.


  • Pre-heat oven to 160 degrees Celsius, fan-assisted.
  • Ground the almonds (TM7 – 10 seconds on 10) and transfer to a separate bowl.
  • Put the sugar and butter into the Thermomix and mix for 20 seconds on speed 4.
  • Add the two eggs, the flour and the almonds.
  • Mix with the Thermomix with the Butterfly for further. (20s on speed 4).
  • Take the pastry out of the fridge and lay it in the tart tin.
  • Lay the almond mixture.
  • Lay the plums in a pretty circle pattern.
  • Put into the oven for 45 minutes at 160 degrees Celsius, fan-assisted.
  • Dust with icing sugar and serve with cream.


Posted in Cooking, Home Life | Leave a comment

Petits moments partagés, grands souvenirs – Pancake – Crepes

Petits moments partagés, grands souvenirs — et une recette qui restera!.

We had Heidi at the house for a week, and it was such a pleasure to share some relaxing time and get to know each other better.

It felt special to reminisce about how her dad and I lived together at my parents’ house nearly 40 years ago, and now, all these years later, his daughter spent a few lovely days with us. Family is truly precious — and creating new memories together is even more special.


Even though her stay was short, she made the most of it, with visits to London, a local pub quiz with Manu, and some great evening chats all together.

She also shared her crêpe recipe, which I’m saving here for future use. From now on, it will be known in our house as Heidi’s recipe… even if it originally comes from a classic North American cookbook, The Joy of Cooking.


Posted in Cooking, Home Life | Leave a comment

Moroccan Style Vegetables


Ingredients :

  • A can of Chickpeas
  • A can of tomatoes
  • one pepper
  • Some carrots, as you see fit
  • 2 Cloves of Garlic
  • 1 chicken stock cube
  • Salt, Pepper
  • Dried Apricots (very important to give some authentic flavour of Sweet and Spicy).
  • A bunch of Parsley or Coriander, depending on your taste
  • Optional: A couple of potatoes
  • Optional: Cauliflower
  • KEY ingredients: The spices are the key ingredients in this dish, and it comes down to what you like or the dishes that you are trying to accompany.
    • Ground Coriander
    • Turmeric
    • Cumin
    • Smoked Paprika
    • Piment de l’espelette
    • Black Pepper
    • Cinnamon (I only like very little of this if any)
    • Ras el Hanout (which is usually a blend of all the spices above and even more).

How to Make :

  • Chop the carrots into big pieces
  • Do the same with Pepper and Potatoes, or all the vegetables you considered.
  • Roast the Garlic and spices for a few minutes, and then add all the other ingredients.
  • Pour 0.5l of Chicken Stock, bring to a boil to cook the vegetables, and reduce slightly.
  • You can make the ragout a bit thicker with a tablespoon of flour if required.


Posted in Cooking, Home Life | Leave a comment

Lamb with Pistachios


Ingredients :

  • 1.5kg approx of deboned lamb shoulder.
  • Salt, Pepper to taste
  • A bunch of curly parsley
  • 80-100g of onion
  • 80-100g of Pistachios
  • 80-100g of Almonds
  • 80-100g of Pine Nuts
  • 80-100g of dates
  • 80-100g of dried Abricots
  • 2tsp of Ras el Hanout spices
  • Some honey (may be a good tablespoon)
  • Olive oil to cover the meat before cooking

How to Make :

  • Blitz all the ingredients in the Thermomix for 10 seconds on 5, this will make a coarse paste.
  • Open up the shoulder flat on the tray.
  • Use the Thermomix mixture as a “farce” and roll the shoulder with some butcher’s twine.
  •  Put in the oven at 140 degrees for 2 to 3 hours. (you can cover with aluminium foil, but make sure you leave some time without the foil to give it a nice colour)

Serve with some Gratin Dauphinois and juicy vegetables…and a good Cote du Rhône


Posted in Cooking, Home Life | Leave a comment

Gratin Dauphinois


Ingredients :

  • 1.2kg of Potatoes, Charlotte’s are the best but others will do.
  • 1 or 2 Garlic Cloves
  • Fresh Thyme
  • Salt, Pepper, Nutmeg
  • Double Cream (2X400ml)
  • 400g of Conte Cheese

How to Make :

  • Mandoline slice the potatoes into 3mm thick pieces
  • Layer the oven proof dish with :
    • Patatoes
    • Salt / Pepper / Thyme
    • Grated Conte Cheese
    • Cover with some cream
  • Repeat until the dish is full
  • Grate some Garlic on one of the layers to give a bit of special flavour
  • Do the same with the nutmeg as it is quite powerfull
  • Place in oven for 60mins at 170 degrees (fan) – or until cooked
  • Check the cooking at it varies on the type of patatoes used.
  • See my other post on patatoes to choose the right type
Posted in Cooking, Home Life | Leave a comment

Shortcrust Pastry – Thermomix TM7 or Manual

A buttery, crisp, and simple pastry base

I’ve been saying for a while that I should make my own shortcrust pastry instead of buying it ready-made—and I finally did.
It’s surprisingly quick, deliciously buttery, and the texture is perfect for any tart or quiche (like my Tomatoes, Bacon and Goat Cheese Quiche).

You can do it entirely by hand, but the Thermomix TM7 makes it very easy.


🧈 Ingredients

For one 28 cm tart (or two small ones):

  • 250 g plain flour

  • 125 g cold unsalted butter, cut into small cubes

  • 1 pinch of salt

  • 1 egg yolk (optional – richer texture)

  • 2 to 3 tbsp cold water (just enough to bind)


⚙️ Method – Thermomix TM7

  1. Add flour, butter, and salt to the bowl.

  2. Mix 10 sec / speed 6 → sandy texture.

  3. Add egg yolk and 2 tbsp cold water.

  4. Mix 15 sec / speed 4, until the dough begins to clump.

  5. Gather into a ball by hand – don’t overwork it.

  6. Wrap in cling film and chill for at least 30 minutes before use.


🖐️ Method – Manual

  1. In a bowl, mix the flour and salt.

  2. Rub in the butter with fingertips until it looks like breadcrumbs.

  3. Add the egg yolk and just enough cold water to form a dough.

  4. Shape into a ball, flatten slightly, wrap, and refrigerate for 30 minutes.


🔥 Baking Tips

  • For quiches: blind-bake at 180 °C (fan) for 15–20 minutes with ceramic beads.

  • For sweet tarts: bake fully with filling at 180 °C for around 30 minutes until golden.

  • The dough freezes beautifully; wrap tightly in cling film.


🧑‍🍳 Notes

  • For sweet pastry, add 1 tbsp sugar and skip the egg yolk.

  • For extra flakiness, replace 20 g of butter with 20 g of lard or shortening.

  • If you use salted butter, skip the pinch of salt.


Perfect for…

  • Quiche Lorraine

  • Goat Cheese & Tomato Tart

  • Lemon Tart or Tarte à la Rhubarbe


Posted in Cooking, Home Life | Leave a comment

Rustic – Pâté de Campagne – Terrine

I am having a go at making some rustic terrine this weekend.

I first made this in 2023. I am planning to make this in large quantities, but freeze some of them for longer-term storage.

I used chicken liver this time in 2025, and it is delicious. I made four jars and a terrine.

I will try to freeze a couple to see how the long term storage works. (We have already eaten a jar in less than 3 days….)


Ingredients :

  • 500g Minced Pork or Shoulder that you mince yourself.
  • 500g Porc liver, I have also used Chicken liver.
  • 500g Pork Belly.
  • 250g Pancetta or Smoked bacon
  • 2 eggs
  • 3 Cloves of Garlic, finely chopped
  • Two medium-sized finely chopped Shallots
  • A tsp of Pepper
  • 3 to 4 Tsp of Salt
  • I like a bit of Nutmeg as well, and Juniper berries are also an optional addition.
  • A little bit of fresh or dried Thyme, a little bit of Parsley
  • A double shot of Cognac, Armagnac, or Port.

How to Make :

  • Mince all the meat on a coarse setting or cut it finely with a knife.(5 seconds on 8 in Thermomix)
  • Cook the liver a tiny bit to seal it in a pan with butter. Then take it out and cut it into small bits.
  • Pour the Cognac into the pan with a teaspoon of sugar and evaporate until you get a nice caramel.
  • Mix all ingredients, spices, and meat until you obtain a homogeneous mixture. best to massage the meat manually.
  • Make sure the conserve jars are sterilised. (I steam mine for 5 to 10 minutes)
  • Put the mixture in the preserved jars.
  • Cook in the oven at 130 degrees Celsius in a bain marie until the temperature in the centre of the jar of meat reaches at least 71 degrees Celsius. I have also done 2 hours.
  • The small jars will be ready before the large ones, so take them out of the oven when they reach 71 degrees Celsius. (This is optional)
  • Take them out of the oven and let them cool. Ideally, you want to press the meat because it will shrink a bit in the jars. Alternatively, you can melt some lard and pour it over the dish. This will fill the gaps and protect for the longer term.
  • Put into the fridge for 24-48 hours before eating.
Posted in Cooking, Home Life | Leave a comment